Understanding Machine Learning Models with MNIST
This blog explores one of the simplest Machine Learning models - MNIST. Learn what's happening line by line and understand how it works. Writing changed the author's life, and the ebook "Writing for Data Scientists" may transform yours too.

Santiago
Machine Learning. I run https://t.co/iZifcK7n47 and write @0xbnomial.

-
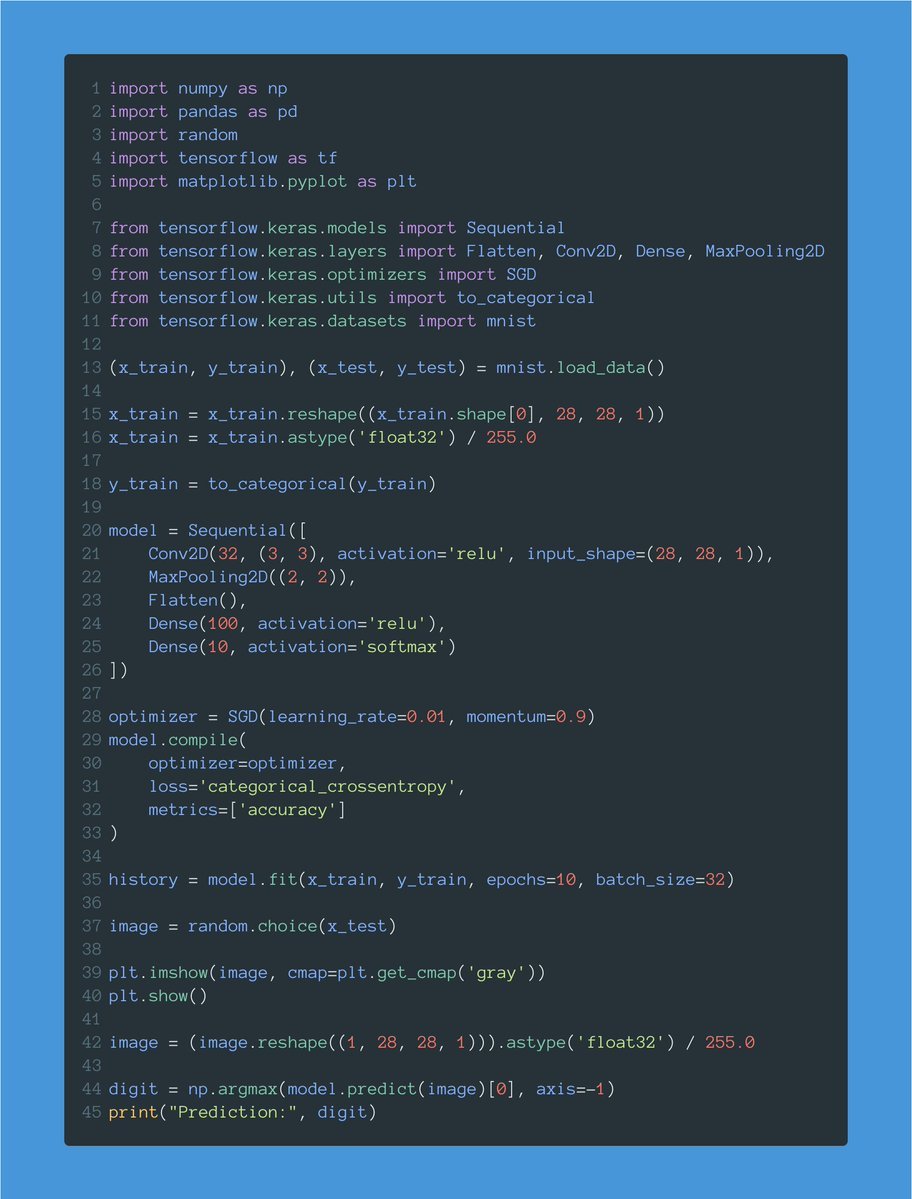
This is one of the simplest Machine Learning models you'll see.
— Santiago (@svpino) June 8, 2023
Most people have heard about MNIST, but only a few can explain how this code works.
Let's go together line by line and understand what's happening here: pic.twitter.com/JNRzuUb9pY -
Writing changed my life.
— Santiago (@svpino) June 8, 2023
One morning, I started learning how to communicate my ideas effectively. The rest is history.
Look at the "Writing for Data Scientists" ebook. It may transform your life too.https://t.co/LbvEYQkCu7
Thanks to @themwiti for sponsoring this thread! pic.twitter.com/DbTfdiQzch -
Let's start by loading the MNIST dataset.
— Santiago (@svpino) June 8, 2023
It contains 70,000 28x28 images showing handwritten digits.
The function returns the dataset split into train and test sets. pic.twitter.com/jwguMawyxp -
x_train and x_test contain our train and test images.
— Santiago (@svpino) June 8, 2023
y_train and y_test contain the target values: a number between 0 and 9 indicating the digit shown in the corresponding image.
We have 60,000 images to train the model and 10,000 to test it. pic.twitter.com/qx3S7nTzPm -
When dealing with images, we need a tensor with 4 dimensions: batch size, width, height, and color channels.
— Santiago (@svpino) June 8, 2023
x_train is (60000, 28, 28). We must reshape it to add the missing dimension ("1" because these images are grayscale.) pic.twitter.com/Bdtm3wpgrP -
Each pixel goes from 0 to 255. Neural networks work much better with smaller values.
— Santiago (@svpino) June 8, 2023
Here we normalize pixels by dividing them by 255. That way, each pixel will go from 0 to 1. pic.twitter.com/hwXzXIDuhL -
Target values go from 0 to 9 (the value of each digit.)
— Santiago (@svpino) June 8, 2023
This line one-hot encodes these values.
For example, this will transform a value like 5 in an array of zeros with a single 1 corresponding to the fifth position:
[0, 0, 0, 0, 0, 1, 0, 0, 0, 0] pic.twitter.com/xxyFL8C4r8 -
Let's now define our model.
— Santiago (@svpino) June 8, 2023
There are several ways to create a model in Keras. This one is called the "Sequential API."
Our model will be a sequence of layers we will define individually. pic.twitter.com/J3z42z8vmD -
A lot is going on with this first line.
— Santiago (@svpino) June 8, 2023
First, we define our model's input shape: a 28x28x1 tensor (width, height, channels.)
This is exactly the shape we have in our train dataset. pic.twitter.com/vcJVmszPv5 -
Then we define our first layer: a Conv2D layer with 32 filters and a 3x3 kernel.
— Santiago (@svpino) June 8, 2023
This layer will generate 32 different representations using the training images. pic.twitter.com/mnAmTwQbjW -
We must also define the activation function used for this layer: ReLU.
— Santiago (@svpino) June 8, 2023
You'll see ReLU everywhere. It's a popular activation function.
It will allow us to solve non-linear problems, like recognizing handwritten digits. pic.twitter.com/8LvxWjrDV9 -
After our Conv2D layer, we have a max pooling operation.
— Santiago (@svpino) June 8, 2023
The goal of this layer is to downsample the amount of information collected by the convolutional layer.
We want to throw away unimportant details and retain what truly matters. pic.twitter.com/0hThPlIzwm -
We are now going to flatten the output. We want everything in a continuous list of values.
— Santiago (@svpino) June 8, 2023
That's what the Flatten layer does. It will give us a flat tensor. pic.twitter.com/zgNLRCRc9k -
Finally, we have a couple of Dense layers.
— Santiago (@svpino) June 8, 2023
Notice how the output layer has a size of 10, one for each of our possible digit values, and a softmax activation.
The softmax ensures we get a probability distribution indicating the most likely digit in the image. pic.twitter.com/7g9uVGOrTa -
After creating our model, we compile it.
— Santiago (@svpino) June 8, 2023
I'm using Stochastic Gradient Descent (SGD) as the optimizer.
The loss is categorical cross-entropy because this is a multi-class classification problem.
We want to record the accuracy as the model trains. pic.twitter.com/bxCxlov56m -
Finally, we fit the model. This starts the training process.
— Santiago (@svpino) June 8, 2023
A couple of notes:
• I'm using a batch size of 32 images.
• I'm running 10 total epochs.
When fit() is done, we'll have a fully trained model! pic.twitter.com/ssFBwYgQTL -
Let's now test the model.
— Santiago (@svpino) June 8, 2023
This gets a random image from the test set and displays it.
Notice that we want the image to come from the test set, containing data the model didn't see during training. pic.twitter.com/u5aqcDOOcq -
We can't forget to reshape and normalize the image as we did before. pic.twitter.com/thxx11UblJ
— Santiago (@svpino) June 8, 2023 -
Finally, I predict the value of the image.
— Santiago (@svpino) June 8, 2023
Remember that the result is a one-hot-encoded vector. That's why I take the argmax value (the position with the highest probability), and that's the result. pic.twitter.com/m98AYcoUmw -
If you have any questions about this code, reply to this thread and I'll help you understand what's happening here.
— Santiago (@svpino) June 8, 2023
